Driver:MSX: Difference between revisions
| Line 179: | Line 179: | ||
The /S2 switches in the commands above are to select slot #2 as the location of the MEGA-SCSI cartridge. On the selected machine -cart2 happens to be in MSX slot #2. On other systems this may be different. | The /S2 switches in the commands above are to select slot #2 as the location of the MEGA-SCSI cartridge. On the selected machine -cart2 happens to be in MSX slot #2. On other systems this may be different. | ||
==== MegaSCSI with CD-ROM ==== | ==== MegaSCSI with CD-ROM ==== | ||
Revision as of 11:53, 2 June 2024
The MSX standard was created by ASCII and Microsoft. Computers for this standard were created by several manufacturers such as Daewoo, Panasonic, Philips, Sanyo, Sony, and Yamaha. There were four generations of MSX computers:
- MSX
- MSX2
- MSX2+
- MSX Turbo-R
When there is no auto booting software inserted the MSX systems boot into MSX-BASIC. From BASIC software can be loaded from cassette or floppy.
Software was mainly released on cartridges, cassettes and floppy disks.
Firmware
Some systems came with firmware which can include functionality like a calendar or a word processor. Most of these firmwares can be disabled either by configuration that is saved in the MSX computer itself or through a configuration switch (available through the MAME Tab menu).
Cartridge
Almost all MSX systems have at least one cartridge slot, most machines have two cartridge slots and some even more than two.
These cartridge slots can be used to insert a cartridge holding software or to extend the functionality of the system by adding a floppy interface for example.
To load the software just mount the software in the cartridge slot (cart1, cart2, etc) and start the emulation. The software should start automatically.
Some examples:
- Play the game Gradius: mame hx10 -cart1 gradius
- Add a floppy disk drive: mame hx10 -cart1 fsfd1
- Play Gradius 2 as a penguin: mame nms8245 -cart1 gradius2 -cart2 pengadv
Extra cartridge slots
Some extensions make more cartridge slots available in a system. For instance by using a slot expander or a Hudson Bee Card adaptor.
The hx10 normally has only one cartridge slot, -cart1. By inserting a BeePack a new cartridge slot, -cart2, becomes available. On base systems that have two cartridge slots the new cartridge slot would be -cart3.
By extending the system with a slot expander, four additional cartridge slots become available. The system cannot be indefinitely expanded like this. The MSX system only knows primary slots and sub-slots. A primary slot can be expanded to 4 sub-slots, but these sub-slots cannot again be expanded.
Almost all cartridge slots are available as primary slots making systems easily expandable.
Some examples:
- Play the game Gradius inserted in a slot expander: mame hx10 -cartslot1 slotexp -cart2 gradius
Cassette
Software on cassette must loaded through BASIC. Software can be stored on a cassette in 3 ways:
- Tokenised Basic
- - This format is stored by using the CSAVE command and can be loaded by using the CLOAD command. There is no command to start the software after it has been loaded, so a RUN command is needed once loading completes.
- ASCII Basic
- - This format is stored by using the SAVE command and can be loaded by using the LOAD"CAS:" or LOAD"CAS:filename" command or started automatically by using the RUN"CAS:" or RUN"CAS:filename" command.
- Binary code
- - This format can be loaded and executed by using the BLOAD"CAS:",R or BLOAD"CAS:filename",R command.
The LOAD/RUN/BLOAD commands need the "CAS:" device identifier on systems that have a floppy disk, otherwise they would try to load the software from floppy.
The entries in the software lists should already have information on which instruction(s) to use for running the software.
Floppy
The most common format used is the 3.5" floppy disk. However, there was also some software released on 5.25" floppy disks.
To use a 5.25" floppy disk, an external floppy interface (avdpf550, cdx2, ddx30d, or ddx30) must be inserted in a cartridge slot. Example:
- mame hx10 -cart1 cdx2 -flop1 amazonia
Most software released on floppies will start automatically. Regular software could be stored on floppy in 2 ways:
- Basic
- - This format is stored by using the SAVE command and can be loaded by using the LOAD"filename" or LOAD"A:filename" command or started automatically by using the RUN"filename" or RUN"CAS:filename" command.
- Binary code
- - This format can be loaded and executed by using the BLOAD"filename",R or BLOAD"A:filename",R command.
By default the files will be loaded from the A: drive. If you want to load a file from a specific (logical) device then the filename can be prefixed with the device specification. For instance RUN"B:start.bas".
MSX-DOS2
MSX-DOS2 adds support for directories and management of memory in memory mappers. The software consists of a cartridge and a floppy containing the MSX-DOS2 environment. The minimum system requirement for MSX-DOS2 is an MSX2 machine.
Quite some Japanese MSX2 computers came with no or a memory mapper too small for MSX-DOS2. This was overcome by adding extra memory in the MSX-DOS2 cartridge in some releases. The MSX system can access this memory through sub-slots in the cartridge. This memory becomes inaccessible when the cartridge is mounted in a cartridge slot that is itself in a sub-slot. This is rare, most cartridge slots are primary slots, but when using a slot expander this situation can occur.
Since the MSX2 computers released in Europe had enough memory installed to run MSX-DOS2 the European release has no additional memory installed in the cartridge.
Currently supported variants:
- msxdos2j (Japan, 256KB RAM)
- msxdos2j_128 (Japan, 128KB RAM)
- msxdos2j_0 (Japan, no extra RAM)
- msxdos2e (Europe, no extra RAM)
Hudson Bee Card
The Hudson Bee Card was a small credit card sized medium. They were cheaper to produce than regular cartridges, and are similar to the HuCards used for the NEC PC-Engine and the MyCards used for the Sega Master System. The Bee Card looks similar to but is not compatible with the Astron SoftCard.
To use a Bee Card on an MSX Computer the Hudson BeePack card reader needs to be inserted in a cartridge slot. To mount the BeePack on an MSX system add -cartslot1 beepack to the command line. Doing so will make a new cartridge interface available to mount the Bee Card software.
The hx10 computer only has 1 cartridge slot so the new cartridge interface will be named cart2. On a machine with 2 cartridge slots, like nms8245, the new cartridge interface will be named cart3.
Some full command line examples:
- mame hx10 -cartslot1 beepack -cart2 bombmnsp
- mame nms8245 -cartslot1 beepack -cart3 bombmnsp
- mame nms8245 -cartslot2 beepack -cart3 bombmnsp
Astron SoftCard
The Electric Software Astron SoftCard was a small credit card sized medium. They were cheaper to produce than regular cartridges. The Astron SoftCard looks similar to but is not compatible with the Hudson Bee Card.
To use an Astron SoftCard on an MSX Computer the Astron SoftCard Adaptor needs to be inserted in a cartridge slot. To mount the SoftCard Adaptor on an MSX system add -cartslot1 softcard to the command line. Doing so will make a new cartridge interface available to mount the SoftCard software.
The hx10 computer only has 1 cartridge slot so the new cartridge interface will be named cart2. On a machine with 2 cartridge slots, like nms8245, the new cartridge interface will be named cart3.
A full command line examples:
- mame hx10 -cartslot1 softcard -cart2 wreck
- mame nms8245 -cartslot1 softcard -cart3 wreck
- mame nms8245 -cartslot2 softcard -cart3 wreck
Harddisk
IDE
Not supported yet.
SCSI
The MSX system uses FAT16 so hard disk partitions are limited to max 32MB. MSX-DOS2 is required to use directories.
To create a 20MB harddisk image using chdman:
- chdman createhd -ss 512 -chs 615,4,16 -c none -o msx_scsi_20mb.hdd
Start the emulation:
- mame nms8245 -cart1 msxdos2e -cart2 nov15966 -hard msx_scsi_20mb.hdd -flop1 nov15964
Once booted execute the following actions:
- Enter the command CD HDDUTILS
- Enter the command NFDISK
- Press INS (Insert) key to create a new partition
- Set the requested partition size (for a single 20MB partition enter the number 19.217)
- Press W, Y(es), and ESC.
- Press any key and the system will reboot into MSX-BASIC because there is no MSX-DOS(2) on the hard disk yet.
- In MSX-BASIC enter the command COPY"B:"TO"A:". This will copy the base MSX-DOS2 files to the hard disk.
- The installation is now complete and the hard disk can be used as you please. If the system is rebooted or the emulation restarted then the system will boot from the hard disk.
When you are used to working with other Microsoft systems then drive A: is usually assigned to the floppy disk. In this case, however, A: is the hard disk and B: is the first floppy disk.
MegaSCSI
The MegaSCSI cartridge is different from other interface cartridges. Instead of ROM it has battery backed RAM. This battery backed RAM needs to be initialised with a disk interface code and a hard disk driver. The hard disk interface code will be copied from the disk interface code and patched with the hard disk interface code.
The MSX system uses FAT16 so hard disk partitions are limited to max 32MB. MSX-DOS2 is required to use directories.
To create a 20MB harddisk image using chdman:
- chdman createhd -ss 512 -chs 615,4,16 -c none -o msx_megascsi_20mb.hdd
The installation process is as follows:
- Start the emulation without MSX-DOS2: mame nms8245 -cart2 megascsi -flop1 megascsi -hard1 msx_megascsi_20mb.hdd
- Setup the cartridge ram disk: ERAMDISK /S2
- Restart the emulation with MSX-DOS2: mame nms8245 -cart1 msxdos2e -cart2 megascsi -flop1 megascsi -hard1 msx_megascsi_20mb.hdd
- This will boot into MSX-DOS2 from the B: drive (the floppy).
- Make a copy of the disk interface rom by executing the command: KSAVER KERNEL.KRN
- Install the hard disk interface code by executing the command: MGINST KERNEL.KRN /S2
- Reset the system. This will boot into MSX-DOS2 from the A: drive (the ram disk).
- This is not mandatory but useful to keep the utilities available. Copy the contents of the floppy to the ram disk by executing the command: COPY B: A:. After this the emulation can be started without the -flop1 megascsi part from the command line: mame nms8245 -cart1 msxdos2e -cart2 megascsi -hard1 msx_megascsi_20mb.hdd
- Setup the hard disk by executing the command: ESET
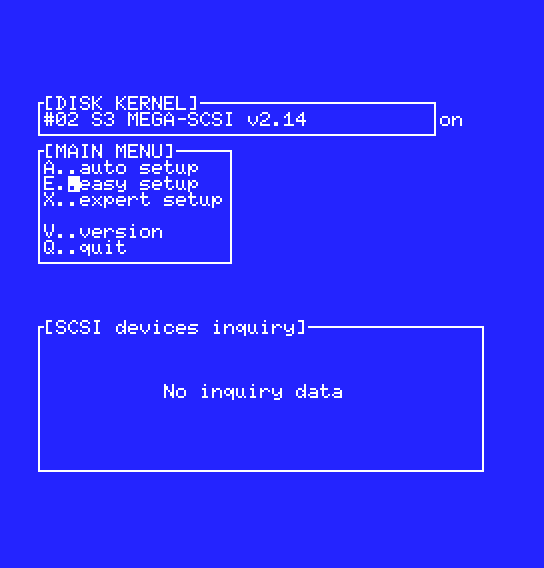
- Press E(asy setup)
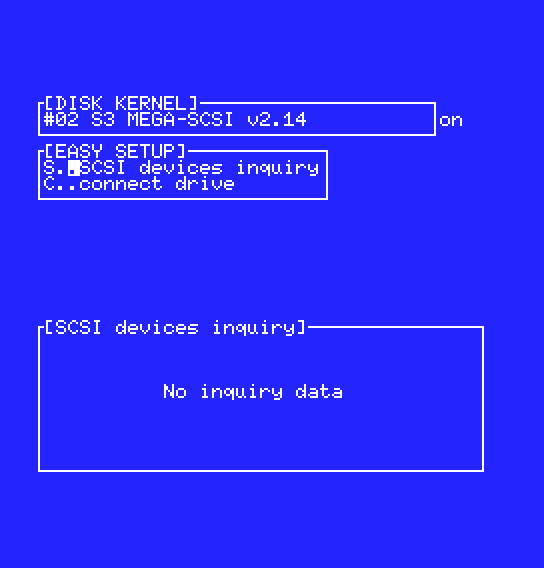
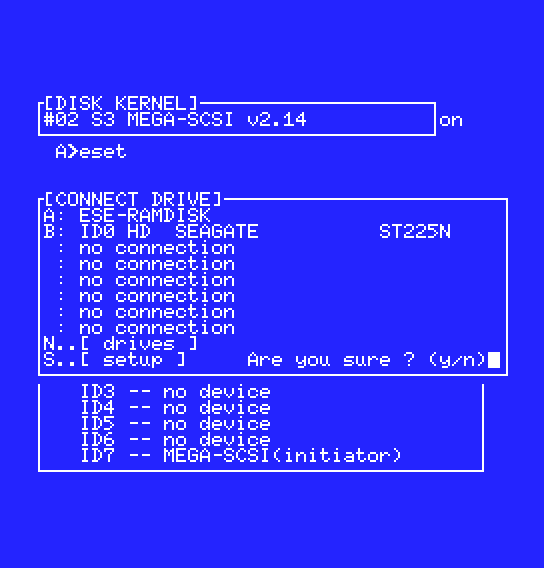
- Press C (Connect drive)
- Press N (drives) followed by 2
- Move to the first 'no connection' line, press cursor right, and use cursor up/down to select 'ID0 HD SEAGATE ST225N', press cursor left.
- Press S (setup) and Y
- Press ESC
- Press Q(uit)
- Reset the system
- The hard disk will now be available as drive B:


If you want to redo this initialisation process remember to remove the megascsi.nv file from the system's folder in the MAME nvram folder.
Since the MegaSCSI's RAM contents are saved in the nvram folder, the MegaSCSI will appear to be uninitialised when starting emulation of a different MSX system and you will have to re-do the initialisation process. You can copy the existing megascsi.nv file to this other MSX system's nvram folder but this is not guaranteed to work due to the copying of the internal disk interface code.
The /S2 switches in the commands above are to select slot #2 as the location of the MEGA-SCSI cartridge. On the selected machine -cart2 happens to be in MSX slot #2. On other systems this may be different.
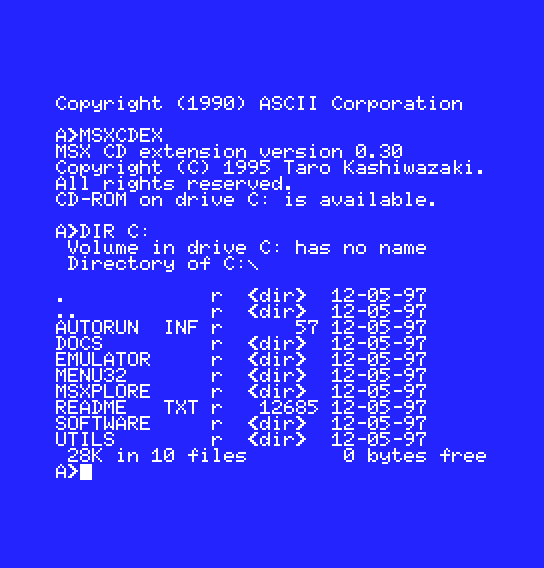
MegaSCSI with CD-ROM
This will show how to make a CD-ROM's contents available to the MSX through the MegaSCSI.
- Start the emulation with mame nms8245 -cart1 msxdos2e -cart2 megascsi -hard1 msx_megascsi_20mb.hdd -cartslot2:mega_scsi:scsi:3 cdrom -cdrom MCCM_Millennium_CD1.iso
- Make the CD-ROM available to the MSX through the ESET utility:
- Press E(asy setup)
- Press C (Connect drive)
- Press N (drives) followed by 3
- Make third line says "C: ID3 CD Sony CDU76S"
- Press S (setup) and Y
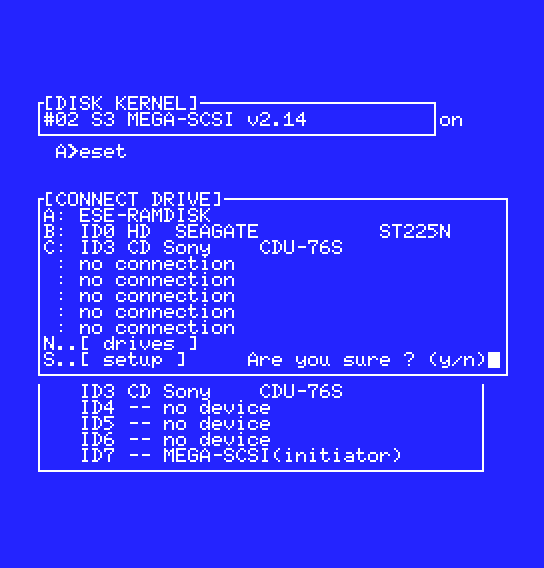
- Press Q(uit)
- Reset the system
- Run the command MSXCDEX
- The contents of the CD-ROM drive will now be available as drive C: *


MIDI
TODO
Other hardware
TODO