Driver:InterPro: Difference between revisions
Pmackinlay (talk | contribs) |
Pmackinlay (talk | contribs) |
||
| Line 3: | Line 3: | ||
The Intergraph InterPro brand name refers to a range of computers featuring the CLIPPER processor, and running CLIX, a port of UNIX System V release 3.1. | The Intergraph InterPro brand name refers to a range of computers featuring the CLIPPER processor, and running CLIX, a port of UNIX System V release 3.1. | ||
The InterPro family of systems all use the CLIPPER processor, originally developed by Fairchild, and then acquired by Intergraph. The CLIPPER is notable for being one of the earliest commercially available RISC CPUs, however it did not reach significant success outside Intergraph's own product line. The CPU was usually combined with an IEEE-754 compliant FPU, a first-level cache, TLB and MMU device originally known as CAMMU, clock control circuitry, and fabricated on a daughter-board that could be easily upgraded in the field. | |||
InterPro systems share some other common traits: | |||
* CLIX operating system (a licensed port of UNIX System V release 3.1) | |||
* Application software backward compatibility | |||
* SCSI hard disks (and later, CD-ROM drives) | |||
* AUI Ethernet port | |||
* PC-compatible 5.25" or 3.5" floppy disk drives | |||
* 3-button mouse and optional digitizing tablet | |||
* A keyboard featuring 85 regular keys plus 57 membrane function/macro keys | |||
* 3 RS-232 ports (via a 3-way breakout cable) | |||
* Large-format plotter interface port and logic | |||
* Boot EPROM containing a diagnostic monitor | |||
* Real time clock and NVRAM | |||
Intergraph's primary markets for the InterPro were for 2D and 3D CAD, computer aided engineering, mapping and GIS applications, and this focus drove the development of relatively sophisticated graphics hardware acceleration and wide support for various 3rd party plotters and printers, especially for large-format output. | |||
<gallery> | <gallery> | ||
c100.png|Fairchild C100 CLIPPER module | |||
c4i.jpg|Intergraph C4I CLIPPER module | |||
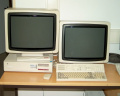
InterAct-32C.jpg|InterAct 32C with dual 19" displays | InterAct-32C.jpg|InterAct 32C with dual 19" displays | ||
InterPro-32C.jpg|InterPro 32C | InterPro-32C.jpg|InterPro 32C | ||
| Line 24: | Line 41: | ||
== Hardware == | == Hardware == | ||
=== Models === | === Models === | ||
The InterPro range consists of 5 distinct generations or families, named after gemstones. The system models within each family share a common architecture and features, usually differing only by CPU type and clock speed. | The InterPro range consists of 5 distinct generations or families, named after gemstones. The system models within each family share a common architecture and features, usually differing only by CPU type and clock speed. | ||
Revision as of 04:11, 18 July 2018
Intergraph InterPro
The Intergraph InterPro brand name refers to a range of computers featuring the CLIPPER processor, and running CLIX, a port of UNIX System V release 3.1.
The InterPro family of systems all use the CLIPPER processor, originally developed by Fairchild, and then acquired by Intergraph. The CLIPPER is notable for being one of the earliest commercially available RISC CPUs, however it did not reach significant success outside Intergraph's own product line. The CPU was usually combined with an IEEE-754 compliant FPU, a first-level cache, TLB and MMU device originally known as CAMMU, clock control circuitry, and fabricated on a daughter-board that could be easily upgraded in the field.
InterPro systems share some other common traits:
- CLIX operating system (a licensed port of UNIX System V release 3.1)
- Application software backward compatibility
- SCSI hard disks (and later, CD-ROM drives)
- AUI Ethernet port
- PC-compatible 5.25" or 3.5" floppy disk drives
- 3-button mouse and optional digitizing tablet
- A keyboard featuring 85 regular keys plus 57 membrane function/macro keys
- 3 RS-232 ports (via a 3-way breakout cable)
- Large-format plotter interface port and logic
- Boot EPROM containing a diagnostic monitor
- Real time clock and NVRAM
Intergraph's primary markets for the InterPro were for 2D and 3D CAD, computer aided engineering, mapping and GIS applications, and this focus drove the development of relatively sophisticated graphics hardware acceleration and wide support for various 3rd party plotters and printers, especially for large-format output.
-
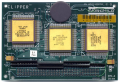
Fairchild C100 CLIPPER module
-

Intergraph C4I CLIPPER module
-
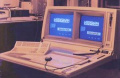
InterAct 32C with dual 19" displays
-
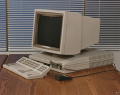
InterPro 32C
-
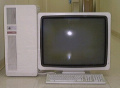
InterPro 6000 with single 27" display
-
InterPro 2430 with dual 21" displays


Status
The MAME driver for the InterPro is a work in progress, and is currently capable of booting and running the CLIX operating system and some software for the InterPro 2020 configuration. Some other models are capable of booting the diagnostic monitor and disk-based diagnostic utilities, but not yet able to install or run CLIX.
There are some known bugs in the driver at this time that may impact some of the processes described below:
- The driver can't reboot itself from software yet, so when it reaches a point at which a reboot is expected, you must exit and restart the system from MAME instead
- Changing or inserting CD-ROMs after start doesn't work, you must shutdown, exit MAME, and restart with a different CD-ROM image specified on the command line
- Sometimes, the mouse will stop working, typically after switching away and back to the MAME process; the only option is to exit and restart MAME, usually triggering a file system check that will delay the boot sequence
- MAME fast forward works 99% of the time, but very occasionally can lead to failures that haven't been investigated yet
Networking hasn't been tested at all under CLIX, so status is unknown at this point.
Hardware
Models
The InterPro range consists of 5 distinct generations or families, named after gemstones. The system models within each family share a common architecture and features, usually differing only by CPU type and clock speed.
| Year | Family | Models | CPU | I/O Processor |
|---|---|---|---|---|
| 1986 | Amethyst | 32C/100/200 300 |
C100 | 80186 80386 |
| 1988 | Topaz | 3000/4000/5000 | C300/C300Plus | 80386 |
| 1990 | Emerald | 6000/6100/6200/6500 6600 |
C300/C300Plus C4 | |
| 1990 | Turquoise | 2000 | C300 | |
| 1992 | Sapphire | 2400/6400 2500/2700/2800/6700/6800 |
C4T C4I |
For Emerald, Turquoise and Sapphire systems, the four-digit model number encodes some aspects of the original system configuration, and breaks down as follows.
| Position | Purpose | Values |
|---|---|---|
| 1 | Case | 2=desktop, 6=minicase |
| 2 | CPU | 0=C300, 4=C4T, 6=C4, 5/7/8=C4I |
| 3 | Graphics | 0=none, 3=MMG, 5=GTDB, 4=EDGE-1, 8=EDGE-2 |
| 4 | Backplane | 0=standard, 5/7/9=? |
As examples using this encoding, an InterPro 2020 is a desktop C300 system fitted with MMG graphics, while an InterPro 6880 is a minicase C4I system with EDGE-2 graphics. Systems configured without graphics are typically fitted with a serial terminal, and branded InterServe rather than InterPro. This model numbering and branding applies to the system cases, but of course changing graphics options will cause a system's software-identified model number to change.
-

Cube Electronics Cabinet
-

Suitcase Electronics Cabinet
-

Lowboy Electronics Cabinet
-

Minicase Electronics Cabinet
-

Two-Bay Electronics Cabinet
-

InterAct Workstation Dual Monitors
-

InterView Workstation Dual Monitors


Cards
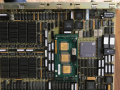
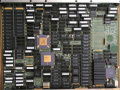
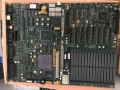
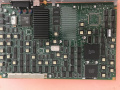
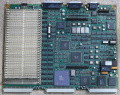
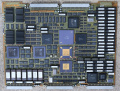
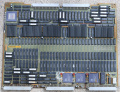
A range of approximately 150 installable cards were produced for the InterPro family. The most common and important of these included the system mainboards and several different graphics options, however a range of less common cards supported functions as diverse as video capture, SCSI expansion, networking and a VME bridge. Desktop InterPro systems support the installation of two cards in addition to the main board, in the horizontal plane and stacked vertically, using an interface referred to as CBUS. Larger systems supported either 5 or 12 vertically oriented slots with an interface referred to as SR or SRX, which is physically incompatible with CBUS.
Regardless of type, card names are typically prefixed by the letter M, followed by PCB or SMT (the latter designation indicating a surface-mount board), followed by a 3-digit board type. Boards are also typically marked with a single character revision number and an ECO (engineering change order) level recording hardware-level fixes.
-
PCB765 - 6000 System Board w/16MB
-
PCB828 - EDGE-1 Graphics f/1 1Mp Monitor (55K/60)
-
SMT047 - 2400 Series System Board
-
SMT070 - 2400 Graphics f/1 1Mp Monitor (V-76)
-
SMT127 - 6700 Series System Board
-
SMT094 - EDGE-2 Plus Processor f/1 2Mp-FB
-
PCB896 - EDGE-2/Plus Frame Buffer f/2Mp Monitor (V-60)


Keyboard


Configuration
Machine configuration
Diagnostics
Installing CLIX
Preparation
Use the MAME chdman utility to prepare a new CHD for the operating system installation. Various different hard disk capacities should work but have not been extensively tested yet. The actual geometry should not matter at all, but the vendor and model strings are queried by the software and may affect the installation process, and there may be some impact if they do not match existing entries in the delivered CLIX /etc/disktab file.
The SCSI INQUIRY response string (defined by the IDNT meta-data tag in the CHD) should consist of an 8 character vendor name, 16 character model number, and 4 character version number, all left justified and padded with spaces.
chdman createhd -o ip2000.chd -chs 1574,7,70
chdman addmeta -i ip2000.chd -t IDNT -vt "MAXTOR  LXT-340S        1.00"
Rebuild Utility
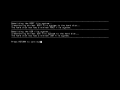
Start the MAME ip2000 driver with the Turquoise "rebuild" floppy disk in the floppy drive, the hard disk connected, and the first system software CD-ROM in the CD-ROM drive. Make sure you have the MAME user interface enabled so you are able to switch floppy disks later in the process.
mame ip2000 -flop rebuild:boot_clipper -hard ip2000.chd -cdrom iss:disc1
If sound is enabled, you should hear two beeps as the keyboard is initialised, and then see I/O system monitor boot message, followed by the "blue screen" utility program.
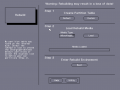
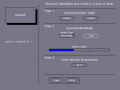
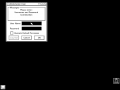
- Use the mouse to select the Utility button, and from the Utility home page, select the Rebuild Utility button.
- Under Step 1, select the Default button to create a default partition table on the hard disk. If you wish, you can examine and modify this default partition table by navigating back to the Utility home page, and using the Disk Partitioning Utility to make changes before loading the rebuild media.
- Once the partition table has been created, re-enter the Rebuild utility page if necessary, and use the MAME in-emulation menu to load the rebuild:20x0_root2 floppy disk image, then select the Load button under Step 2 and hit Enter.
- The utility should indicate progress on screen, and prompt you to repeat the process for floppy root images 3 and 4 in sequence.
- After the rebuild media has been loaded, select the Boot button to enter the rebuild environment.
If you need to restart MAME at any point after the rebuild media has been installed, you can repeat the steps above (that is, boot from the rebuild:boot_clipper floppy, and enter the Rebuild Utility), and then proceed directly to Step 3.
-

I/O System Monitor
-
Blue Screen
-
Rebuild Utility
-
Load Rebuild Media


Rebuild Environment
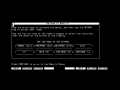
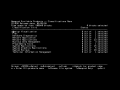
After a few seconds, you should see the initial CLIX boot messages, and shortly after see the "Welcome to Rebuild" text-based user interface.
- Use the key bound to the keypad minus key to continue, and then press Enter to select the Rebuild all menu option.
- Use the key bound to PF3 to save the file system settings, and the rebuild environment should begin to rebuild the root and usr file systems; this process may require around 5 minutes to complete.
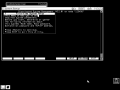
- Use the arrow keys to navigate to the Load Software option, press Enter to proceed, select the Local CD/ROM option, and hit Enter when prompted to insert a newprod CD/ROM.
- Once the newprod utility has launched, press "a" to auto-select all the necessary software, and "u" to begin the installation process. The process will prompt for a variety of installation options; generally defaults are acceptable, but may be changed at your own discretion. This process normally requires at least 30 minutes to complete.
- Once software installation is complete, accept the prompt to remove the rebuild environment, press PF1 to cancel from the Download software menu option, and select the Reboot option. Once the "System reboot in progress" message is displayed, exit MAME.
-
Rebuild Welcome
-
Rebuild File Systems
-
Software Installation


Boot CLIX
Once the system rebuild process is complete, the I/O System Monitor, blue screen utilities, and the CLIX operating system itself should be able to be booted directly from the hard disk. In most cases, the ISS disc1 CD-ROM should also be mounted to permit the installation of additional optional software packages.
mame ip2000 -hard ip2000.chd -cdrom iss:disc1
At the initial boot into CLIX, the system will automatically launch the Distributed System Management (DSM) utility, and begin the First-time System Setup process to configure TCP/IP networking and some other key settings. This utility can be operated by selecting the menu options, responding to configuration prompts and using the PF keys to toggle options, save choices or exit the program. Once complete the system should be restarted again and the standard CLIX environment is ready for use.
At the first start of the standard CLIX environment, and depending upon the options applied in DSM, the root password may have been automatically expired. The simplest way to reset it is to expand the Console icon, and log in using that window. This will enable the root password to be reset, after which the "Workstation User" window of the screen manager may be used normally.
Note: EnvironV uses the middle mouse button as the standard "action" button, while the left button is normally used to open menus and the right button used to cancel an operation.
-
Distributed System Management
-
CLIX EnvironV Screen Manager

